Today I suddenly realized that I couldn’t access my home NAS from outside the network, and the notes stored on it wouldn’t sync either. It took me a while to figure out the cause—a SoftBank router update had blocked incoming IPv6 connections. I’ve previously shared a method for “removing the ‘non-443 port’ suffix,” which can resolve many access issues, but that approach was completely ineffective against this IPv6 block.
Since the old method didn’t work, I switched to a new solution: Lucky + Cloudflare (CF) Tunnel. This solved the problem perfectly. Below, I’ll walk you through the detailed steps one by one so even beginners can follow along.
First, let me talk about the main tool I’ve been using—Lucky
Lucky is a highly integrated utility that combines a variety of practical features, including DDNS, reverse proxy, intranet access, port forwarding, WebDAV, and the CorazaWAF firewall. Whether you’re using a standard router or installing it via Docker, it works seamlessly.
Even better is its “lightweight” design: common setup combinations (such as NPM+cloudflared+ddclient) can take up 600–800 MB of disk space after installation and consume a significant amount of RAM; in contrast, the Lucky package is less than 30 MB, and its daily RAM usage is just over 50 MB, making it particularly well-suited for devices with limited hardware resources.
Next, I’ll walk you through the setup step by step—just follow along 👇
Step 1: Create a tunnel in Cloudflare
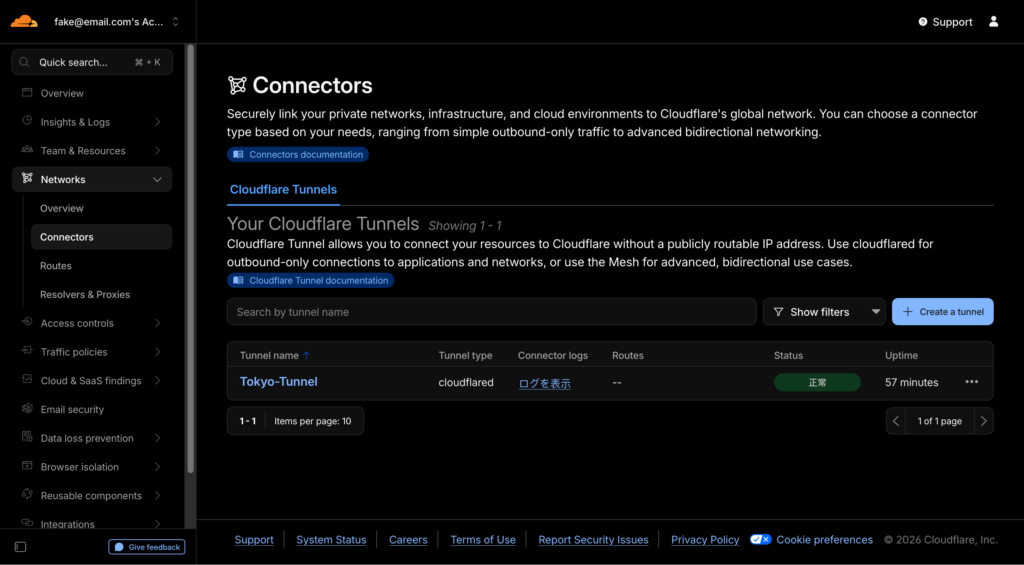
- Log in to your Cloudflare account, go to [Zero Trust] → [Network] → [Connectors], and click the [Create Tunnel] button.
- Follow the on-screen prompts to name the tunnel (any name will do, as long as you can tell them apart). Once creation is complete, the page will display a tunnel token.
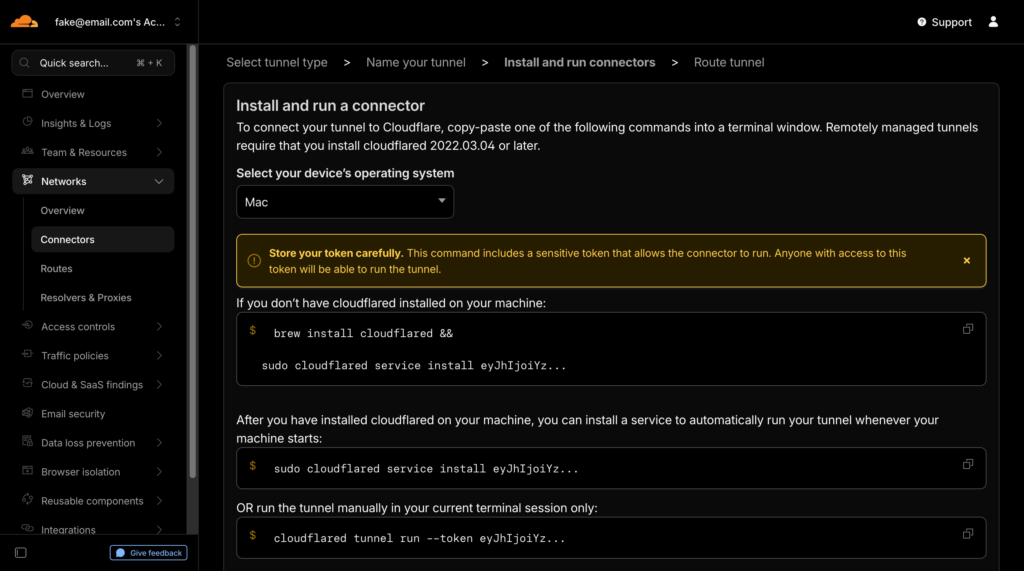
⚠️ Important reminder: This token is only displayed once! Be sure to copy it immediately, paste it into a text editor, and save it securely. If you lose it, you’ll have to recreate the tunnel. For example
, the page will display something like--token 一串字符,--tokenAll characters following that are the tunnel token we need. Even if it isn’t displayed in full, you must copy and save the entire string.
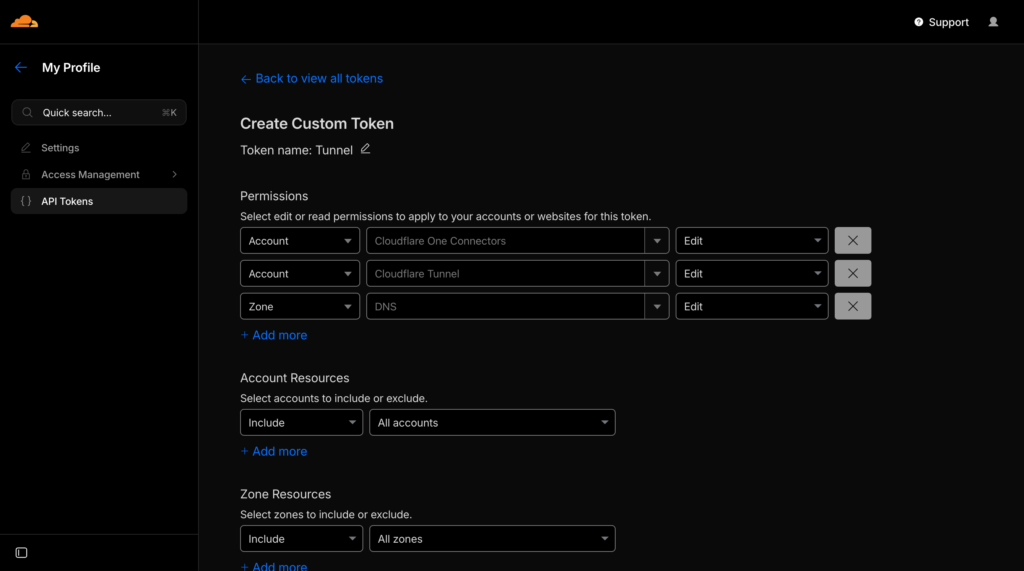
Step 2: Create a Cloudflare API token
- Click the profile icon in the upper-right corner of the page, go to [Profile], locate the [API Token] option, and click [Create Token].
- Select [Use Template] or configure permissions manually, and check the permissions as required below:
- Permission 1: Account → Cloudflare Tunnel → Edit
- Permission 2: Zone → DNS → Edit
- For 【Account Resources】 and 【Region Resources】, select “All Accounts/Regions,” or specify the account and region corresponding to the specific domain you want to use.
- After clicking “Save,” the page will generate an API token, which is also displayed only once! Copy and save it; we recommend labeling it “API-Token” to avoid confusing it with the “Tunnel-Token” from the first step.
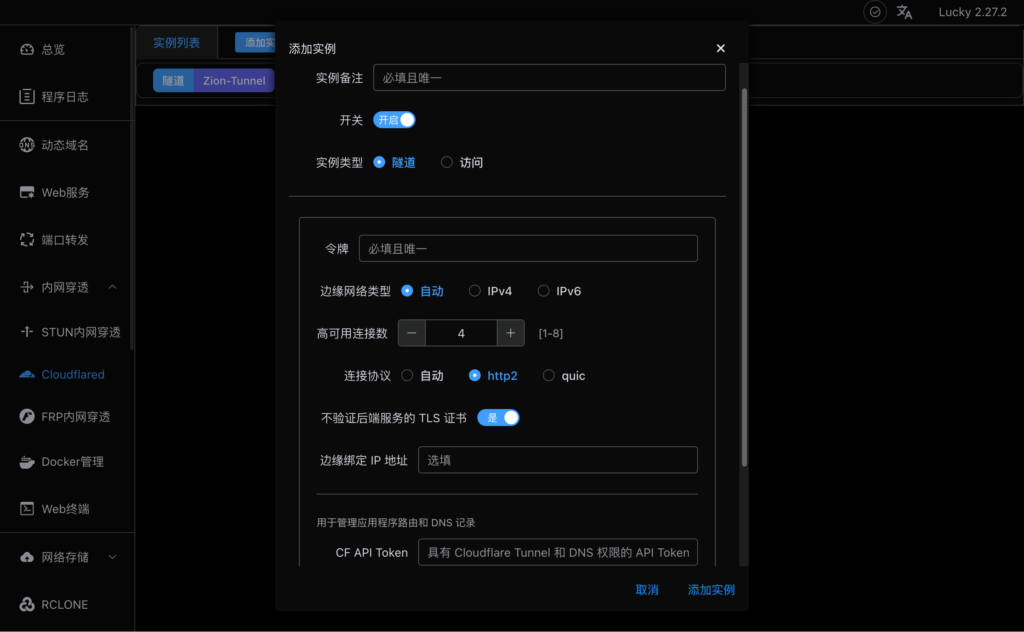
Step 3: Add tunnel settings in Lucky
- Open the Lucky management interface, navigate to [Internal Network Penetration] → [Cloudflare], and click [Add Instance].
- Fill in the parameters according to the instructions below; leave any other options that aren’t mentioned here at their default settings:
- Note: Enter a name of your choice to help identify the purpose of this tunnel (e.g., “NAS Access Tunnel”).
- Instance type: Select [Tunnel]
- First token input field: Paste the “Tunnel-Token” you saved in the first step
- In the CF API Token input field at the bottom: Paste the “API-Token” you saved in Step 2.
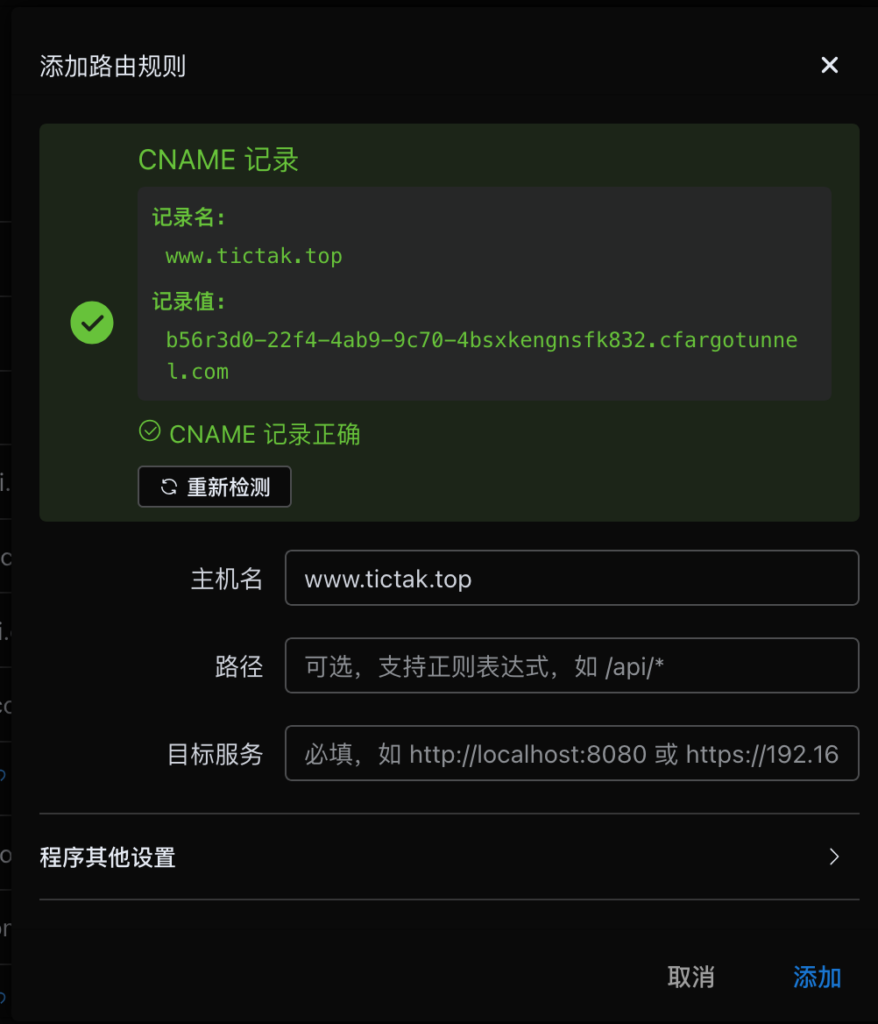
- After saving, you’ll see the newly added item in the tunnel list. Click [Apply Route] next to it, and the page will display a unique record value. Copy this value in its entirety.
Step 4: Configure DNS resolution in Cloudflare
- Return to the Cloudflare dashboard, go to [DNS] > [Records], and click [Add Record].
- Select the record type [CNAME] and fill in the required information:
- Name: Enter the domain prefix you want to use to access the service (for example, if you want to access it via nas.xxx.com, enter “nas”)
- Content: Paste the record values copied from Lucky in the previous step
- Proxy status: Tap the “Little Yellow Cloud” icon (to enable CDN and proxy)
- Click “Save,” and the DNS record is now configured.
Step 5: Complete the final setup and start using it
- Return to the tunnel configuration page in Lucky, and enter the full domain name you created in the previous step (e.g., nas.xxx.com) in the [Hostname] field.
- Click [Test] next to it. Once the test result turns green, it means the tunnel is connected.
- In the [Destination Service] field, enter the address and port of the device on your internal network (for example, the NAS address 192.168.1.100:5000). After saving, you will be able to access the service normally via the domain name.
Finally, let’s discuss the pros and cons of this approach.
✅ Pros: Compared to traditional “DDNS + reverse proxy” solutions, this method offers stronger encryption. Plus, since traffic is routed through Cloudflare, it’s virtually impossible for ISPs to block or intercept it, ensuring maximum stability.
❌ Cons: Currently, it only supports services using the HTTP and HTTPS protocols. If you need to use other protocols, such as Remote Desktop or FTP, this solution isn’t suitable—you’ll need to find an alternative.